Users enter their own data into this database using a simple webform. Users can view the entire database online in one of several formats, or download the entire database or only selected portions of it either as CSV spreadsheet files or as PDF Files, sorted either by call, by grid, or by azimuth.
When downloading the database, the user has the choice of downloading either the entire database, or just those stations with 222 MHz and above capability, or just those stations with 10 GHz and above capability. Additionally, the user can specify that the downloaded file contain only those stations active on a given day, on a given weekend, or during any specified timespan.
The database also generates, if requested, the PackRatsToLookFor list as either a PDF file or a text file suitable for use with PackRatFinder.
Additionally, the database results may be viewed on a web-broswer-based map display which also has the capability of showing "live", real-time information on database stations as well as stations that are not in the database, but whose data is coming directly from either [1] the web-browser-based map app, or [2] from APRS, or [3] from a phone app developed for rovers and available from the Google Play Store.
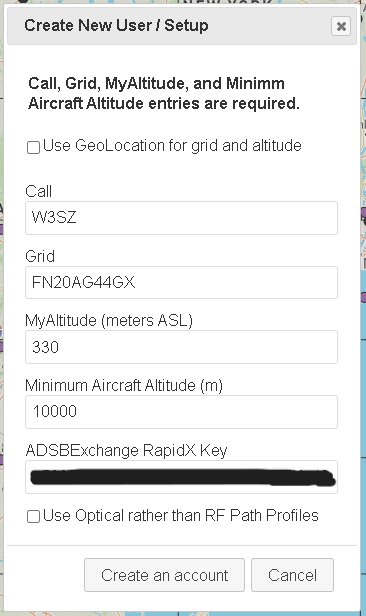
The web-based map is at https://w3sz.com/map.php and tutorials on the web-based map are here. In order to use the map you need to enter some station parameters on the New User form, which is accessed by left-clicking the "Info" button at the bottom left corner of the map. On this form you need to enter your call, your grid (more digits is better), and the altitude of your antennas above sea level in meters (meters ASL). The Minimum Aircraft Altitude will default to 10000 meters if you leave it blank. If you have an ADSBExchange RapidX Key (which is used for accessing online aircraft position data) enter it in the box labeled "ADSBExchange RapidX Key". If you don't have such a key, then leave this box blank. When you are done entering this data, your box should look something like this image, and you can then left-click the button "Create an account" and your data will be entered into the browser and you are ready to use the map.
Several functions have been added to the map since the tutorials were created in May of 2020. These additional functions include but are not limited to display of weather radar information (which is activated by clicking the "WX" button along the left map border), Aircraft information (which is activated by clicking the "AC" button which is located just below the "WX" button), and Ship information (which is activated by clicking the "SH" button which is located just below the "AC" button). In order to see aircraft, you will need an account with ADSBExchange, in exchange for which you will be expected to upload aircraft from your ADSB receiver to their server. A description of what you need to do to set up the aircraft display function is at https://w3sz.com/obtainADSBExchAPI.html. Typing "p" while the map has focus or left-clicking the "Help" button located near the bottom center of the map will bring up a list of the map keyboard commands.
The URL for the phone app listing in the Google Play Store is here.
To point your APRS station to the map so that you will be displayed on the map you just need to set your SSID to "SSID-9" and put the word "rover" (case-insensitive) in your APRS Comments (message) field. For example, I would set my SSID to "W3SZ-9" and type "rover" in the APRS Comments (message) field. My application that handles the APRS messages automatically appends "/R" to the callsign, so don't set your SSID to something like "W3SZ/R", but rather just use something like "W3SZ".
The main page has links to all of the other database pages that might be used by the user. It also has a link to an online Azimuth-Distance-Reverse Bearing calculator, and to links that will allow downloading of the "Between Contests" 10 GHz Station list. All downloads include Azimuth-Distance-Reverse Bearing data for each station in the database from the gridsquare that you specify as yours when you request the database download. The main page also has a list of 10 GHz beacons which may be sorted by callsign, grid, azimuth, or frequency, and all beacons for every band from 50 MHz through 76 GHz that are listed by WZ1V are available on the web-based map.
The database is designed so that you ONLY NEED TO ENTER ALL OF YOUR STATION DATA ONCE. Once you have entered your station data, it will be saved and you never need to enter it again unless it changes. "Station data" includes your:
callsign
name
cellphone number
whether or not you are a member of the Mt. Airy VHF Radio Club
whether or not you are active on 10 GHz between contests
up to 3 sets of "liaison" information (4 if you are active on 10 GHz between contests)
the frequency bands that you have
output power and antenna information for each of those bands
grid squares and dates and times of operation from each grid square that you list for your station operation.
To get started with first-time data entry for your station, click on the link on the Main Page or at the bottom of one of the other database webpages labeled "Click here to go to data entry / record update page". Then enter your callsign into the text box that pops up on the new page and click "Submit".
Note that you must enter ONLY A SINGLE CALLSIGN in this text box. Acceptable entries are of the form "W3SZ" for fixed stations and "W3SZ/R" for rovers. If you are a fixed station you must NOT have a "/R" appended to your call. If you are a rover you MUST have a "/R" appended to your callsign. Multiple call entries such as "W3SZ/K2SZA" or "W3SZ & K2SZA" are unacceptable and if such entries are found, the second callsign will be removed from the entry.
When you click "Submit" after entering your callsign on this page, you will be taken to the "K1RZ / W3SZ Database - New Record Entry" form. This page starts with text boxes for callsign, name and cell phone number. Enter your callsign, name, and cell phone number in the appropriate boxes. If you don't enter at least Callsign, Name, Cell phone number, and Grid you will get an error message and be asked to try again. If you don't want to enter your cell phone number, then enter the appropriate number of zeros instead and then your data will be accepted. Below those textboxes is a checkbox that should be checked if you are a member of the Mt. Airy VHF Radio Club. Check the Mt. Airy VHF Radio Club box if you are a member of that club.
Next is a checkbox that should be checked if you are active on 10 GHz between contests. If you check this, then three radio buttons and a text entry field will appear. Check one of the 3 radio buttons, for "Home" or "Portable" operation between contests, or for "Both". Enter liaison information that is specific for between-contest operation in the text box. This information will appear in your database record ONLY if the checkbox indicating 10 GHz operation between contests is checked.
Below that are 3 checkboxes. Checking any one of these boxes will open up a text box where up to 240 characters of liaison information can be entered. Liaison 1 might have the entry "144.260 USB", Liaison 2 might say "223.5 MHz FM", and Liaison 3 might say "ON4KST Region 2 144/432", or perhaps contain your email address for example. Enter the appropriate data into one, two, or all three of these boxes. If the checkbox for a given liaison text field is checked, then that information will appear in your database printout. If the checkbox is not checked for a given liaision text field, then the data contained in that text field will not appear in the database output for your station.
Next are a number of checkboxes, one for each band between 50 MHz and 76 GHz, plus light. You should check the checkbox for each band that you have available. When a checkbox is checked, it opens up textboxes where you can enter transmit power in watts and antenna gain in dBi. A link is provided to an online calculator in case you don't know the gain of your microwave dishes. This gain information is something that EVERY VHF/UHF/Microwave operator should know about his/her station. Take the opportunity to upgrade your knowledge base if you don't already know this information!
When you have finished these tasks, you have completed entering all of your station data. If you know what your plans are for the next upcoming contest, you can now proceed with entering contest-specific information for the next contest in which you will be participating.
Below the "Liaison" checkboxes (and also below the text boxes which appear if you have checked any of the Liaison checkboxes) are the gridsquare checkboxes, where up to 30 grids can be entered. You should check a box for each grid that you will activate during a contest. When a grid checkbox is checked, it opens up a checkbox where the 6 digit grid can be entered, and also date and time picker tools, so that the start date and start time and stop date and stop time can be entered for each grid.
If you want to appear in the database results, then you need to have checked at least one grid box.
If you have entered the same grid into the database more than once, then only one of those entries should have its grid box checked.
If you have entered grid information but then decide that you are not going to activate that grid in the next contest, you DO NOT need to erase the grid information that you had entered. Just "uncheck" its checkbox and the grid won't appear in your station listings for the upcoming contest. But if you want to use the grid in a future contest you then before that future contest you just need to "check" its checkbox and update its Start and Stop times and dates.
Once all of this has been done, you must click the Submit button and then your data will be uploaded to the database. If you don't see the Submit button, that is because [1] you have not entered all of the necessary data or [2] you have entered some data incorrectly or [3] you are using an obsolete browser.
Once you have entered your data, it will remain available for future contests. You can make changes to your data by clicking on the link labeled "Click here to go to data entry / record update page", just as you did for initial data entry, and then, just as you did before, enter your callsign and then click the Submit button. Because you have previously entered data into the database, this will now bring up the "Update Record Form", which appears very similar to the data entry page, except that all entry boxes are expanded, and alll the data that you had previously entered into the database now prefills the form so that now you only need to enter any changes that you want to make (such as new dates and times for each grid) before clicking the Submit button to upload the changes to the database.
If you are a rover and you are using the same grids as in the previous contest, then you just need to change the Start and Stop time for each grid. If you are a rover and you are not using some of the grids that you used in the last contest, simply "uncheck" their checkboxes and the grids will not appear in your new database listings. If you are a rover and are adding new grids, just "check" the checkboxes for the new grids you want to add and fill in the 6-10 digit grid locator and the Start and Stop time for each of the new grids.
If you are a fixed station, make sure that you update your Start and Stop times for the contest by making these changes for your single grid entry.
Whether you are a fixed station OR a rover, if you don't plan to participate at all in the next contest, please take the time to uncheck ALL of the grid checkboxes for your entry. Then your call will not appear in the lists of active stations generated for the next contest by this online database, thereby reducing the "noise" in the database that would otherwise be produced by such an extraneous entry.
If you will not be using some of the bands in your database listing, simply "uncheck" the checkboxes for those bands and they will not appear in your new database listing. If you again have those bands available in a future contest, then just "check" the checkboxes for those bands again when you update your listing for that future contest.
When you have made all of the necessary changes to your listing, just click the "Submit" button and your changes will be saved.
Note that the database is designed for you to enter grids and times for ONLY ONE CONTEST AT A TIME. For example, if the next upcoming contest is the "ARRL 222 and Up Distance Contest" and you are operating that contest, then enter your grids and times ONLY for THAT contest. WAIT to enter your grids and times for the NEXT contest, the "ARRL 10 GHz and Up Contest", until AFTER the ARRL 222 and Up Contest is over!
There are a number of options for reviewing the data. The easiest way to view the data in on the web-based map app at https://w3sz.com/map.php. There is also a sortable web data display that allows you to sort the data by any column, and also to search the database for any text parameter. You can search for any text you want in any column. If you want to see all stations with the letter combination SZ in their callsigns, then just click the scrollable listbox that says "All Columns" and select "Callsign". The type "SZ" in the adjacent listbox and all entries with the letter combination "SZ" in the callsign will be displayed. If you want to display all stations using 144.260 as liaison, then set the scrollable listbox to "All Columns" and type "144.260" in the adjacent listbox and all such stations will appear. You could instead select "Liaison 1" in the scrollable listbox, but then if the station had typed 144.260 in the Liaison 2 box instead of the Liaison 1 box you would miss that station. You can also search for all stations operating on any band, those that are using the Pack Rats Chat Room, etc. ANY text that is ANYWHERE in the database can be searched for and displayed by this method. And once you have displayed the data, you can sort by any column by clicking on the header for that column. There is also a non-sortable web data display that displays the data in a simple but complete manner, although I am not sure why you would want to use that given that the sortable display just described is available.
The Database File Download Page has multiple options for download. As noted above, you can download data for all bands, or limit the download to only stations using 222 MHz and above, or only 10 GHz and above. Additionally, you can choose either CSV or PDF format, and data sorted by either callsign, grid, or Azimuth. Furthermore, you can choose to limit the downloaded data to either a single day or a single weekend (or other time span of your choosing). In total, there are more than TWENTY TWO different formats and data subsets that you can select from when downloading data for contest operations. Additionally, as noted above, on the main page of the database you can download the information for stations active on 10 GHz between contests, either in csv or pdf form, and sorted by either call, grid, or azimuth. If that is not enough choices for you, then you are welcome to download one of the CSV files and do your own parsing and sorting.
73 and Enjoy,
Roger
W3SZ